写在前面
开发Web应用,对页面的安全控制通常是必须的。比如:对于没有访问权限的用户需要转到登录表单页面。要实现访问控制的方法多种多样,可以通过Aop、拦截器实现,也可以通过框架实现,例如:Apache Shiro、Spring Security。我们这里要讲的Spring Security 就是一个Spring生态中关于安全方面的框架。它能够为基于Spring的企业应用系统提供声明式的安全访问控制解决方案。
默认认证用户名密码
项目pom.xml添加spring-boot-starter-security依赖
1
2
3
4
| <dependency>
<groupId>org.springframework.boot</groupId>
<artifactId>spring-boot-starter-security</artifactId>
</dependency>
|
重启你的应用。再次打开页面,你讲看到一个登录页面

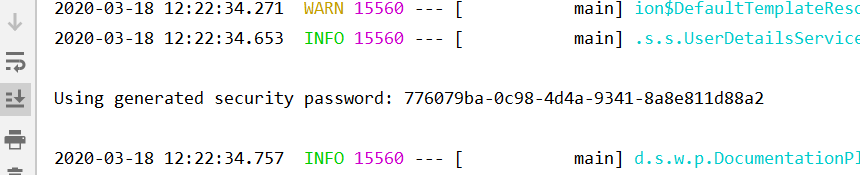
既然跳到了登录页面,那么这个时候我们就会想,这个登录的用户名以及密码是什么呢?让我们来从SpringBoot源码寻找一下。你搜一下输出日志,会看到下面一段输出:

这段日志是UserDetailsServiceAutoConfiguration类里面的如下方法输出的:

通过上面的这个类,我们可以看出,是SecurityProperties这个Bean管理了用户名和密码。在SecurityProperties里面的一个内部静态类User类里面,管理了默认的认证的用户名与密码。代码如下
1
2
3
4
5
6
7
8
9
10
11
12
13
14
15
16
17
18
19
20
21
22
23
24
25
26
27
28
29
30
31
32
33
34
35
36
37
38
39
40
41
42
43
44
45
46
47
48
49
50
51
52
53
54
55
56
57
58
59
60
61
62
63
64
65
66
67
68
69
70
71
72
73
74
75
76
77
78
79
80
81
82
83
84
85
86
87
| @ConfigurationProperties(
prefix = "spring.security"
)
public class SecurityProperties {
public static final int BASIC_AUTH_ORDER = 2147483642;
public static final int IGNORED_ORDER = -2147483648;
public static final int DEFAULT_FILTER_ORDER = -100;
private final SecurityProperties.Filter filter = new SecurityProperties.Filter();
private SecurityProperties.User user = new SecurityProperties.User();
public SecurityProperties() {
}
public SecurityProperties.User getUser() {
return this.user;
}
public SecurityProperties.Filter getFilter() {
return this.filter;
}
public static class User {
private String name = "user";
private String password = UUID.randomUUID().toString();
private List<String> roles = new ArrayList();
private boolean passwordGenerated = true;
public User() {
}
public String getName() {
return this.name;
}
public void setName(String name) {
this.name = name;
}
public String getPassword() {
return this.password;
}
public void setPassword(String password) {
if (StringUtils.hasLength(password)) {
this.passwordGenerated = false;
this.password = password;
}
}
public List<String> getRoles() {
return this.roles;
}
public void setRoles(List<String> roles) {
this.roles = new ArrayList(roles);
}
public boolean isPasswordGenerated() {
return this.passwordGenerated;
}
}
public static class Filter {
private int order = -100;
private Set<DispatcherType> dispatcherTypes;
public Filter() {
this.dispatcherTypes = new HashSet(Arrays.asList(DispatcherType.ASYNC, DispatcherType.ERROR, DispatcherType.REQUEST));
}
public int getOrder() {
return this.order;
}
public void setOrder(int order) {
this.order = order;
}
public Set<DispatcherType> getDispatcherTypes() {
return this.dispatcherTypes;
}
public void setDispatcherTypes(Set<DispatcherType> dispatcherTypes) {
this.dispatcherTypes = dispatcherTypes;
}
}
}
|
综上所述,security默认的用户名是user, 默认密码是应用启动的时候,通过UUID算法随机生成的,默认的role是”USER”。当然,如果我们想简单改一下这个用户名密码,可以在application.properties配置你的用户名密码,例如

当然这只是一个初级的配置,更复杂的配置,可以分不用角色,在控制范围上,能够拦截到方法级别的权限控制。
内存用户名密码认证
在上面的内容,我们什么都没做,就添加了spring-boot-starter-security依赖,整个应用就有了默认的认证安全机制。下面,我们来定制用户名密码。写一个继承了 WebSecurityConfigurerAdapter的配置类,具体内容如下
1
2
3
4
5
6
7
8
9
10
11
12
13
14
15
16
17
18
19
20
21
22
23
24
25
| import org.springframework.context.annotation.Configuration;
import org.springframework.security.config.annotation.authentication.builders.AuthenticationManagerBuilder;
import org.springframework.security.config.annotation.method.configuration.EnableGlobalMethodSecurity;
import org.springframework.security.config.annotation.web.builders.HttpSecurity;
import org.springframework.security.config.annotation.web.configuration.EnableWebSecurity;
import org.springframework.security.config.annotation.web.configuration.WebSecurityConfigurerAdapter;
@Configuration
@EnableWebSecurity
@EnableGlobalMethodSecurity(prePostEnabled = true, securedEnabled = true, jsr250Enabled = true)
public class WebSecurityConfig extends WebSecurityConfigurerAdapter {
@Override
protected void configure(HttpSecurity http) throws Exception {
super.configure(http);
}
@Override
protected void configure(AuthenticationManagerBuilder auth) throws Exception {
auth.inMemoryAuthentication()
.passwordEncoder(new BCryptPasswordEncoder())
.withUser("admin")
.password(new BCryptPasswordEncoder().encode("1234567"))
.roles("USER");
}
}
|
这里对上面的代码进行简要说明:
Spring security 5.0中新增了多种加密方式,也改变了默认的密码格式。需要修改一下configure中的代码,我们要将前端传过来的密码进行某种方式加密,Spring Security 官方推荐的是使用bcrypt加密方式。inMemoryAuthentication().passwordEncoder(new BCryptPasswordEncoder()),这相当于登陆时用BCrypt加密方式对用户密码进行处理。以前的”.password("123")“ 变成了 “.password(new BCryptPasswordEncoder().encode("123"))“,这相当于对内存中的密码进行Bcrypt编码加密。如果比对时一致,说明密码正确,才允许登陆。
通过 @EnableWebSecurity注解开启Spring Security的功能。使用@EnableGlobalMethodSecurity(prePostEnabled = true)这个注解,可以开启security的注解,我们可以在需要控制权限的方法上面使用@PreAuthorize,@PreFilter这些注解。
继承 WebSecurityConfigurerAdapter 类,并重写它的方法来设置一些web安全的细节。我们结合@EnableWebSecurity注解和继承WebSecurityConfigurerAdapter,来给我们的系统加上基于web的安全机制。
在configure(HttpSecurity http)方法里面,我们进入到源码中,就会看到默认的认证代码是:

从方法名我们基本可以看懂这些方法的功能。上面的那个默认的登录页面,就是SpringBoot默认的用户名密码认证的login页面。我们使用SpringBoot默认的配置super.configure(http),它通过 authorizeRequests() 定义哪些URL需要被保护、哪些不需要被保护。默认配置是所有访问页面都需要认证,才可以访问。
通过 formLogin() 定义当需要用户登录时候,转到的登录页面。
configureGlobal(AuthenticationManagerBuilder auth) 方法,在内存中创建了一个用户,该用户的名称为root,密码为root,用户角色为USER。这个默认的登录页面是怎么冒出来的呢?是的,SpringBoot内置的,SpringBoot甚至给我们做好了一个极简的登录页面。这个登录页面是通过Filter实现的。具体的实现类是org.springframework.security.web.authentication.ui.DefaultLoginPageGeneratingFilter。同时,这个DefaultLoginPageGeneratingFilter也是SpringBoot的默认内置的Filter。
输入用户名,密码,点击Login。不过,我们发现,SpringBoot应用的启动日志还是打印了如下一段:
但实际上,已经使用了我们定制的用户名密码了。如果我们要配置多个用户,多个角色,可参考使用如下示例的代码:
1
2
3
4
5
6
7
8
9
10
11
12
| @Override
protected void configure(AuthenticationManagerBuilder auth) throws Exception {
auth.inMemoryAuthentication()
.passwordEncoder(new BCryptPasswordEncoder())
.withUser("admin")
.password(new BCryptPasswordEncoder().encode("1234567"))
.roles("USER")
.and()
.withUser("admin1")
.password(new BCryptPasswordEncoder().encode("123"))
.roles("ADMIN", "USER");
}
|
角色权限控制
当我们的系统功能模块当需求发展到一定程度时,会不同的用户,不同角色使用我们的系统。这样就要求我们的系统可以做到,能够对不同的系统功能模块,开放给对应的拥有其访问权限的用户使用。Spring Security提供了Spring EL表达式,允许我们在定义URL路径访问(@RequestMapping)的方法上面添加注解,来控制访问权限。在标注访问权限时,根据对应的表达式返回结果,控制访问权限:
Spring Security可用表达式对象的基类是SecurityExpressionRoot。
1
2
3
4
5
6
7
8
9
10
11
12
13
14
15
16
17
18
19
20
21
22
23
24
25
26
27
28
29
30
31
32
33
34
35
36
37
38
39
40
41
42
43
44
45
46
47
48
49
50
51
52
53
54
55
56
57
58
59
60
61
62
63
64
65
66
67
68
69
70
71
72
73
74
75
76
77
78
79
80
81
82
83
84
85
86
87
88
89
90
91
92
93
94
95
96
97
98
99
100
101
102
103
104
105
106
107
108
109
110
111
112
113
114
115
116
117
118
119
120
121
122
123
124
125
126
127
128
129
130
131
132
133
134
| public abstract class SecurityExpressionRoot implements SecurityExpressionOperations {
protected final Authentication authentication;
private AuthenticationTrustResolver trustResolver;
private RoleHierarchy roleHierarchy;
private Set<String> roles;
private String defaultRolePrefix = "ROLE_";
public final boolean permitAll = true;
public final boolean denyAll = false;
private PermissionEvaluator permissionEvaluator;
public final String read = "read";
public final String write = "write";
public final String create = "create";
public final String delete = "delete";
public final String admin = "administration";
public SecurityExpressionRoot(Authentication authentication) {
if (authentication == null) {
throw new IllegalArgumentException("Authentication object cannot be null");
} else {
this.authentication = authentication;
}
}
public final boolean hasAuthority(String authority) {
return this.hasAnyAuthority(authority);
}
public final boolean hasAnyAuthority(String... authorities) {
return this.hasAnyAuthorityName((String)null, authorities);
}
public final boolean hasRole(String role) {
return this.hasAnyRole(role);
}
public final boolean hasAnyRole(String... roles) {
return this.hasAnyAuthorityName(this.defaultRolePrefix, roles);
}
private boolean hasAnyAuthorityName(String prefix, String... roles) {
Set<String> roleSet = this.getAuthoritySet();
String[] var4 = roles;
int var5 = roles.length;
for(int var6 = 0; var6 < var5; ++var6) {
String role = var4[var6];
String defaultedRole = getRoleWithDefaultPrefix(prefix, role);
if (roleSet.contains(defaultedRole)) {
return true;
}
}
return false;
}
public final Authentication getAuthentication() {
return this.authentication;
}
public final boolean permitAll() {
return true;
}
public final boolean denyAll() {
return false;
}
public final boolean isAnonymous() {
return this.trustResolver.isAnonymous(this.authentication);
}
public final boolean isAuthenticated() {
return !this.isAnonymous();
}
public final boolean isRememberMe() {
return this.trustResolver.isRememberMe(this.authentication);
}
public final boolean isFullyAuthenticated() {
return !this.trustResolver.isAnonymous(this.authentication) && !this.trustResolver.isRememberMe(this.authentication);
}
public Object getPrincipal() {
return this.authentication.getPrincipal();
}
public void setTrustResolver(AuthenticationTrustResolver trustResolver) {
this.trustResolver = trustResolver;
}
public void setRoleHierarchy(RoleHierarchy roleHierarchy) {
this.roleHierarchy = roleHierarchy;
}
public void setDefaultRolePrefix(String defaultRolePrefix) {
this.defaultRolePrefix = defaultRolePrefix;
}
private Set<String> getAuthoritySet() {
if (this.roles == null) {
Collection<? extends GrantedAuthority> userAuthorities = this.authentication.getAuthorities();
if (this.roleHierarchy != null) {
userAuthorities = this.roleHierarchy.getReachableGrantedAuthorities(userAuthorities);
}
this.roles = AuthorityUtils.authorityListToSet(userAuthorities);
}
return this.roles;
}
public boolean hasPermission(Object target, Object permission) {
return this.permissionEvaluator.hasPermission(this.authentication, target, permission);
}
public boolean hasPermission(Object targetId, String targetType, Object permission) {
return this.permissionEvaluator.hasPermission(this.authentication, (Serializable)targetId, targetType, permission);
}
public void setPermissionEvaluator(PermissionEvaluator permissionEvaluator) {
this.permissionEvaluator = permissionEvaluator;
}
private static String getRoleWithDefaultPrefix(String defaultRolePrefix, String role) {
if (role == null) {
return role;
} else if (defaultRolePrefix != null && defaultRolePrefix.length() != 0) {
return role.startsWith(defaultRolePrefix) ? role : defaultRolePrefix + role;
} else {
return role;
}
}
}
|
通过阅读源码,我们可以更加深刻的理解其EL写法,并在写代码的时候正确的使用。变量defaultRolePrefix硬编码约定了role的前缀是”ROLE_”。同时,我们可以看出hasRole跟hasAnyRole是一样的。hasAnyRole是调用的hasAnyAuthorityName(defaultRolePrefix, roles)。所以,我们在学习一个框架或者一门技术的时候,最准确的就是源码。通过源码,我们可以更好更深入的理解技术的本质。
SecurityExpressionRoot为我们提供的使用Spring EL表达式总结如下:
| 表达式 | 描述 |
|–|–|
|hasRole([role]) |当前用户是否拥有指定角色。|
|hasAnyRole([role1,role2]) |多个角色是一个以逗号进行分隔的字符串。如果当前用户拥有指定角色中的任意一个则返回true。|
|hasAuthority([auth]) |等同于hasRole|
|hasAnyAuthority([auth1,auth2]) |等同于hasAnyRole|
|Principle |代表当前用户的principle对象|
|authentication |直接从SecurityContext获取的当前Authentication对象|
|permitAll |总是返回true,表示允许所有的|
|denyAll| 总是返回false,表示拒绝所有的|
|isAnonymous() |当前用户是否是一个匿名用户|
|isRememberMe()| 表示当前用户是否是通过Remember-Me自动登录的|
|isAuthenticated() |表示当前用户是否已经登录认证成功了。|
|isFullyAuthenticated() |如果当前用户既不是一个匿名用户,同时又不是通过Remember-Me自动登录的,则返回true。|
在Controller方法上添加@PreAuthorize这个注解,value="hasRole('ADMIN')")是Spring-EL expression,当表达式值为true,标识这个方法可以被调用。如果表达式值是false,标识此方法无权限访问。
在Spring Security里面获取当前登录认证通过的用户信息
如果我们想要在前端页面显示当前登录的用户怎么办呢?在在Spring Security里面怎样获取当前登录认证通过的用户信息?下面我们就来探讨这个问题。其实很好办。我们添加一个LoginFilter,默认拦截所有请求,把当前登录的用户放到系统session中即可。在Spring Security中,用户信息保存在SecurityContextHolder中。Spring Security使用一个Authentication对象来持有所有系统的安全认证相关的信息。这个信息的内容格式如下:
1
2
3
4
5
6
7
8
9
10
11
12
| {
"accountNonExpired":true,
"accountNonLocked":true,
"authorities":[{
"authority":"ROLE_ADMIN"
},{
"authority":"ROLE_USER"
}],
"credentialsNonExpired":true,
"enabled":true,
"username":"root"
}
|
这个Authentication对象信息其实就是User实体的信息,类似如下(当然,密码没放进来)。
1
2
3
4
5
6
7
8
9
10
| public class User implements UserDetails, CredentialsContainer {
private String password;
private final String username;
private final Set<GrantedAuthority> authorities;
private final boolean accountNonExpired;
private final boolean accountNonLocked;
private final boolean credentialsNonExpired;
private final boolean enabled;
....
}
|
我们可以使用下面的代码(Java)获得当前身份验证的用户的名称:
1
2
3
4
5
6
7
| Object principal = SecurityContextHolder.getContext().getAuthentication().getPrincipal();
if (principal instanceof UserDetails) {
String username = ((UserDetails)principal).getUsername();
} else {
String username = principal.toString();
}
|
通过调用getContext()返回的对象是SecurityContext的实例对象,该实例对象保存在ThreadLocal线程本地存储中。使用Spring Security框架,通常的认证机制都是返回UserDetails实例,通过如上这种方式,我们就可以拿到认证登录的用户信息。
用数据库存储用户和角色,实现安全认证
很多时候,我们需要的是实现一个用数据库存储用户和角色,实现系统的安全认证。为了简化讲解,本例中在权限角色上,我们简单设计两个用户角色:USER,ADMIN。我们设计页面的权限如下:
- 首页/ : 所有人可访问
- 登录页 /login: 所有人可访问
- 普通用户权限页 /httpapi, /httpsuite: 登录后的用户都可访问
- 管理员权限页 /httpreport : 仅管理员可访问
- 无权限提醒页: 当一个用户访问了其没有权限的页面,我们使用全局统一的异常处理页面提示。
配置Spring Security
我们首先使用Spring Security帮我们做登录、登出的处理,以及当用户未登录时只能访问: http://localhost:8080/ 以及 http://localhost:8080/login 两个页面。同样的,我们要写一个继承WebSecurityConfigurerAdapter的配置类:
1
2
3
4
5
6
7
8
9
10
11
12
13
14
15
16
17
18
19
20
21
22
23
24
25
26
27
28
29
30
31
32
33
34
35
36
37
38
39
40
41
42
43
44
45
46
47
48
49
50
51
52
53
54
55
56
57
58
59
60
61
62
63
64
65
66
67
| import com.springboot.in.action.service.LightSwordUserDetailService;
import org.springframework.context.annotation.Bean;
import org.springframework.context.annotation.Configuration;
import org.springframework.security.config.annotation.authentication.builders.AuthenticationManagerBuilder;
import org.springframework.security.config.annotation.method.configuration.EnableGlobalMethodSecurity;
import org.springframework.security.config.annotation.web.builders.HttpSecurity;
import org.springframework.security.config.annotation.web.configuration.EnableWebSecurity;
import org.springframework.security.config.annotation.web.configuration.WebSecurityConfigurerAdapter;
import org.springframework.security.core.userdetails.UserDetailsService;
@Configuration
@EnableWebSecurity
@EnableGlobalMethodSecurity(prePostEnabled = true, securedEnabled = true, jsr250Enabled = true)
public class WebSecurityConfig extends WebSecurityConfigurerAdapter {
@Override
@Bean
public UserDetailsService userDetailsService() {
return new AdminUserDetailService();
}
@Override
protected void configure(HttpSecurity http) throws Exception {
http.csrf().disable();
http.authorizeRequests()
.antMatchers("/").permitAll()
.antMatchers("/amchart/**",
"/bootstrap/**",
"/build/**",
"/css/**",
"/dist/**",
"/documentation/**",
"/fonts/**",
"/js/**",
"/pages/**",
"/plugins/**"
).permitAll()
.anyRequest().authenticated().and()
.formLogin().loginPage("/login")
.defaultSuccessUrl("/httpapi").permitAll().and()
.logout().permitAll();
http.logout().logoutSuccessUrl("/");
}
@Override
protected void configure(AuthenticationManagerBuilder auth) throws Exception {
auth.userDetailsService(());
}
}
|
上面的代码只做了基本的配置,其中:
- 覆盖写userDetailsService方法,具体的AdminUserDetailsService实现类,就是之前说的获取用户信息的service层类。
- 默认不拦截静态资源的url pattern。我们也可以用下面的WebSecurity这个方式跳过静态资源的认证。
1
2
3
4
5
| public void configure(WebSecurity web) throws Exception {
web
.ignoring()
.antMatchers("/resourcesDir/**");
}
|
- 跳转登录页面url请求路径为/login,我们需要定义一个Controller把路径映射到login.html。
- 登录成功后跳转的路径为/httpapi
- 退出后跳转到的url为/
- 认证鉴权信息的Bean,采用我们自定义的从数据库中获取用户信息的AdminUserDetailService类。
我们同样使用@EnableGlobalMethodSecurity(prePostEnabled = true)这个注解,开启security的注解,这样我们可以在需要控制权限的方法上面使用@PreAuthorize,@PreFilter这些注解。
用户退出
我们在configure(HttpSecurity http)方法里面定义了任何权限都允许退出,当然SpringBoot集成Security的默认退出请求是/logout
1
| http.logout().logoutSuccessUrl("/");
|
配置错误处理页面
访问发生错误时,跳转到系统统一异常处理页面。我们首先添加一个GlobalExceptionHandlerAdvice,使用@ControllerAdvice注解:
1
2
3
4
5
6
7
8
9
10
11
12
13
14
15
16
17
| import org.springframework.web.bind.annotation.{ControllerAdvice, ExceptionHandler}
import org.springframework.web.context.request.WebRequest
import org.springframework.web.servlet.ModelAndView
@ControllerAdvice
class GlobalExceptionHandlerAdvice {
@ExceptionHandler(value = Exception.class)
public ModelAndView exception(Exception exception, WebRequest request){
ModelAndView modelAndView = new ModelAndView("/error");
modelAndView.addObject("errorMessage", exception.getMessage());
modelAndView.addObject("stackTrace", exception.getStackTrace());
return modelAndView;
}
}
|
其中,@ExceptionHandler(value = Exception.class),表示捕捉到所有的异常,这里你也可以捕捉一个你自定义的异常。比如说,针对安全认证的Exception,我们可以单独定义处理。此处不再赘述。
Author:
DengBoCong
Permalink:
http://dengbocong.cn/Spring-Boot/a86e53449298/
License:
Licensed under the Apache License, Version 2.0 (the "License")
Slogan:
Stay hungry, Stay foolish.